- Home
- Products
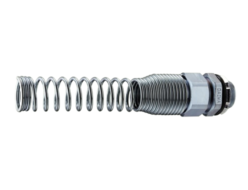
- Yamato Electric Vinyl Braid Coated (Double Coated) Flexible FCK Dedicated Connector MSK, MAK
Yamato Electric
Yamato Electric Vinyl Braid Coated (Double Coated) Flexible FCK Dedicated Connector MSK, MAK
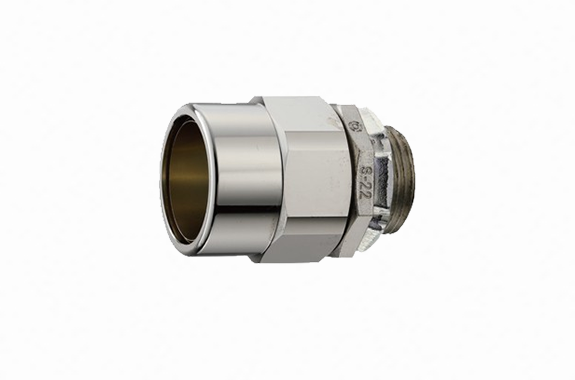
Manufacturer: Yamato Electric Industry Co., Ltd
Model: MSK, MAK
This is a dedicated connector for FCK (P20), designed with waterproof and anti-cutting powder protection in mind.
Except for spring-type connectors, other flexible conduit connectors can also be adapted for FCK use. (Please contact us for details)
Waterproof and dustproof structure: Protection grade IP67 (Refer to P12 flexible conduit and connector compatibility table)
90° Angle Connector MAK
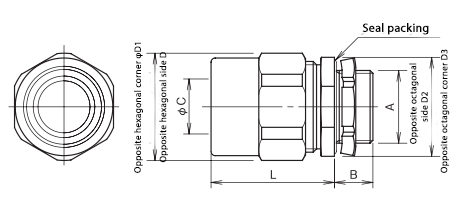
| Nominal Size/ Part Number | Heavy Steel Conduit Thread A | B | Inner Diameter C | Length Before Tightening L | Opposite Flat D | Opposite Corner D1 | Opposite Flat D2 | Opposite Corner D3 | Weight (g) | ||
| Conduit Thread Nominal Size | Pipe Parallel Thread Nominal Size | Recommended Mounting Hole Diameter | |||||||||
| MSK-10-16 | CTG 16 | G 1/2 | 21 | 14 | 8.2 | 40 | 27 | 29 | 27 | 29 | 108 |
| 12-16 | CTG 16 | G 1/2 | 21 | 14 | 10.7 | 41 | 27 | 29 | 27 | 29 | 100 |
| 16-16 | CTG 16 | G 1/2 | 21 | 14 | 14 | 45.5 | 32 | 35 | 32 | 34.5 | 147 |
| 16-22 | CTG 22 | G3/4 | 27 | 14 | 14 | 45.5 | 32 | 35 | 36 | 39 | 165 |
| 22-22 | CTG 22 | G3/4 | 27 | 14 | 18.9 | 45.5 | 36 | 39 | 36 | 39 | 155 |
| 28-28 | CTG 28 | G 1 | 34 | 16 | 24.5 | 49 | 46 | 49 | 46 | 50 | 295 |
| 36-36 | CTG 36 | G 11/4 | 42 | 18 | 33.1 | 50.5 | 55 | 59 | 54 | 58.5 | 354 |
| 42-42 | CTG 42 | G 11/2 | 48 | 18 | 38.1 | 56 | 60 | 65 | 60 | 65 | 425 |
| 54-54 | CTG 54 | G 2 | 60 | 20 | 49.4 | 59.5 | 75 | 81 | 75 | 81 | 700 |
| Material | Body: Zinc alloy die-cast | ||||||||||
| Remarks | |||||||||||
Straight Connector MSK
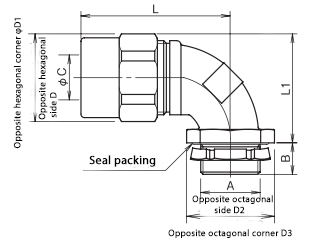
| Nominal Size/ Part Number | Heavy Steel Conduit Thread A | B | Inner Diameter C | Length Before Tightening L | L1 | Opposite Flat D | Opposite Corner D1 | Opposite Flat D2 | Opposite Corner D3 | Weight (g) | ||
| Conduit Thread Nominal Size | Pipe Parallel Thread Nominal Size | Recommended Mounting Hole Diameter | ||||||||||
| MAK-10-16 | CTG 16 | G 1/2 | 21 | 14 | 8.2 | 55 | 33 | 27 | 29 | 27 | 29 | 127 |
| 12-16 | CTG 16 | G 1/2 | 21 | 14 | 10.7 | 57.5 | 37 | 27 | 29 | 27 | 29 | 124 |
| 16-16 | CTG 16 | G 1/2 | 21 | 14 | 14 | 61 | 40 | 32 | 35 | 27 | 29 | 178 |
| 16-22 | CTG 22 | G3/4 | 27 | 14 | 14 | 66.5 | 42 | 32 | 35 | 36 | 39 | 201 |
| 22-22 | CTG 22 | G3/4 | 27 | 14 | 18.9 | 67 | 49 | 36 | 39 | 36 | 39 | 225 |
| 28-28 | CTG 28 | G 1 | 34 | 16 | 24.5 | 74.5 | 57 | 46 | 49 | 46 | 50 | 393 |
| 36-36 | CTG 36 | G 11/4 | 42 | 18 | 33.1 | 79.5 | 65 | 55 | 59 | 54 | 58.5 | 524 |
| 42-42 | CTG 42 | G 11/2 | 48 | 18 | 38.1 | 89.5 | 73 | 60 | 65 | 60 | 65 | 686 |
| 54-54 | CTG 54 | G 2 | 60 | 20 | 49.4 | 104 | 91 | 75 | 81 | 77 | 81 | 1165 |
| Material | Body: Zinc alloy die-cast | |||||||||||
| Remarks | ||||||||||||
Component Configuration
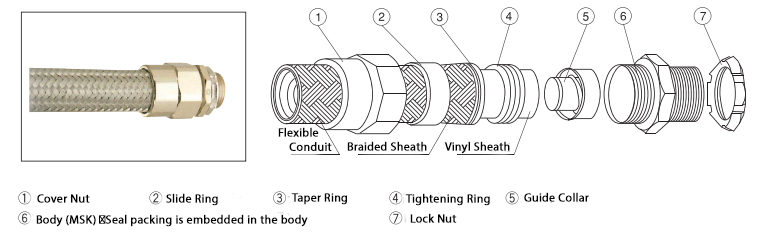
Assembly Instructions


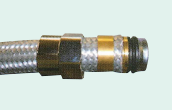

Cut the flexible conduit (flex) to the required length.
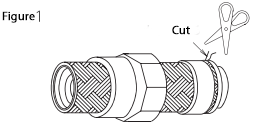
(Wrap tape around the cut location before cutting.)Without removing the tape, use pliers to cut and remove all of the braided layer that is embedded into the vinyl at the cut end. (Photo 1)
(This will make step 4 easier.)Pass the cover nut ① and the slide ring ② through the flex.
Make sure of the direction of the slide ring.
(The thicker side should face the cover nut — see component diagram.)Remove the tape and slide the braid back so that about 20 mm of the vinyl sheath is visible. (Photo 2)
Insert the taper ring ③ between the braid and vinyl so that the step edge of the taper ring is aligned with the edge of the braid.
Slide ring ② is then pushed up to meet taper ring ③. (Photo 3)
Cut off any braid protruding between slide ring ② and taper ring ③ with pliers. (Fig. 1)
Pass tightening ring ④ over the vinyl sheath, then screw guide collar ⑤ into the inner diameter of the flex. (Photo 4)
① Pull the cover nut toward guide collar ⑤.
(It’s difficult to perform the task if you try to pull while turning the cover nut.)Hold connector body ⑥ in a vise and tighten the cover nut ①. (Photo 5)
Note:
The structure fixes the braid in place when the cover nut is securely tightened.
If only temporarily tightened, the braid may come loose.
Be sure to fully tighten the cover nut once.
Related Products
-

Yamato Electric GAN3-NS-2DFM
-
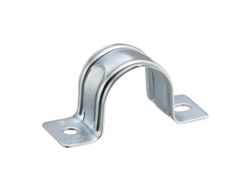
Yamato Electric FCD Series Adjustable Saddle
-
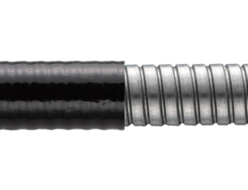
Yamato Electric FCVF Series Sealed-Type Vinyl Coated Flexible Conduit (Heat-Resistant)
-

Yamato Electric KCD-20 Side Mounting Type/ Outdoor Use
-
Yamato Electric TAYS/ TYS Series Spring-Loaded Connector for Cables
-
Yamato Electric LS2-SFM
REQUEST QUOTATION

PAYMENT

LINK