Sakai
Sakai LCS-M Series Precision Spring Coupling
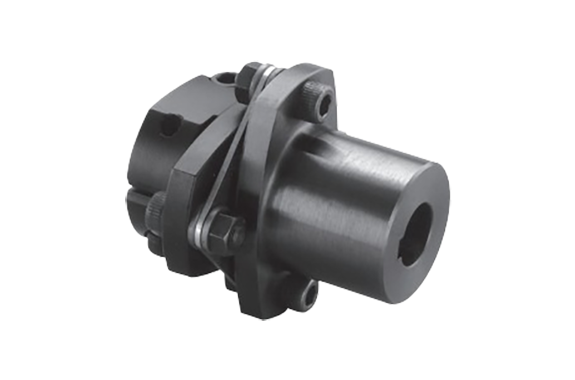
Manufacturer: Sakai Manufacturing Co., Ltd.
Model: LCS-M Series
Feature
- 1/10 tapered shaft specification and bolt clamp specification shaft fastening are combined.
Specifications
(Dimensions: mm)
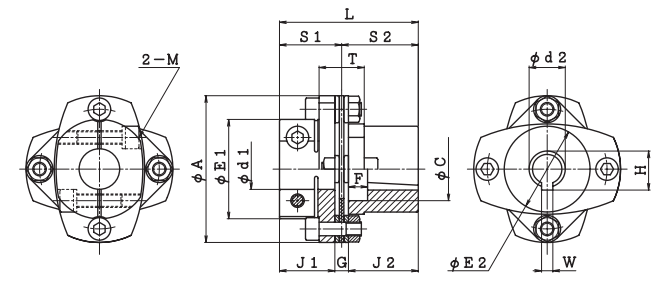
| Model number | d1 (Clamp Side Shaft Diameter) | d2 (Taper Side Shaft Diameter) | W | H | A | E1 | E2 | C | F | L | J1 | J2 | G | S1 | S2 | T | M |
|---|---|---|---|---|---|---|---|---|---|---|---|---|---|---|---|---|---|
| LCS-55M | 10~19 | 11 | 4 | 12.3 | 55 | 38 | 38 | 18 | 4 | 44.8 | 20 | 20 | 4.8 | 22.4 | 22.4 | 17 | M5 |
| LCS-65M | 12~25 | 11 | 4 | 12.3 | 65 | 44 | 44 | 18 | 8.5 | 54.5 | 24.5 | 24.5 | 5.5 | 27.25 | 27.25 | 20 | M6 |
| 16 | 5 | 17.4 | 65 | 44 | 38 | 28 | 10 | 70 | 24.5 | 40 | 5.5 | 27.25 | 42.75 | 20 | M6 | ||
| LCS-80M | 12~35 | 16 | 5 | 17.4 | 80 | 57 | 48 | 28 | 10 | 74.8 | 29 | 40 | 5.8 | 31.9 | 42.9 | 20 | M8/M6 |
| LCS-90M | 17~35 | 16 | 5 | 17.4 | 90 | 63 | 52 | 28 | 10 | 79.5 | 31 | 40 | 8.5 | 35.25 | 44.25 | 29 | M8 |
| Model number | Allowable torque N・m | Allowable eccentricity mm | Allowable deviation angle ° | Allowable axial displacement mm | Maximum rotation speed min-1 | Torsional stiffness | Axial spring constant N/mm | Moment of inertia kg・m2 | Mass kg | |
|---|---|---|---|---|---|---|---|---|---|---|
| Overall N・m/rad | Leaf spring only N・m/rad | |||||||||
| LCS-55M | 25 | 0.02 | 1 | ±0.39 | 10000 | 2.94×10⁻⁴ | 5.00×10⁴ | 59 | 0.93×10⁻⁴ | 0.34 |
| LCS-65M | 40 | 0.02 | 1 | ±0.46 | 10000 | 5.88×10⁻⁴ | 1.30×10⁵ | 124 | 2.15×10⁻⁴ | 0.56 |
| 2.19×10⁻⁴ | 0.60 | |||||||||
| LCS-80M | 80 | 0.02 | 1 | ±0.58 | 10000 | 1.18×10⁻⁵ | 2.04×10⁵ | 74 | 5.40×10⁻⁴ | 1.00 |
| LCS-90M | 180 | 0.02 | 1 | ±0.64 | 10000 | 1.76×10⁻⁵ | 3.90×10⁵ | 89 | 1.01×10⁻³ | 1.43 |
Clamp Tightening Part Standard Shaft Hole Diameter: d₁
| Model number | 10 | 11 | 12 | 13 | 14 | 15 | 16 | 17 | 18 | 19 | 20 | 22 | 24 | 25 | 28 | 30 | 32 | 35 |
|---|---|---|---|---|---|---|---|---|---|---|---|---|---|---|---|---|---|---|
| LCS-55M | ◆ | ◆ | ◆ | ◆ | ● | ● | ● | ● | ● | ● | ||||||||
| LCS-65M | ◆ | ◆ | ◆ | ◆ | ● | ● | ● | ● | ● | ● | ● | ● | ||||||
| LCS-80M | ◆ | ◆ | ◆ | ◆ | ● | ● | ● | ● | ● | ● | ● | ● | ● | ● | ● | |||
| LCS-90M | ● | ● | ● | ● | ● | ● | ● | ● | ● | ● |
- The allowable radial direction displacement indicates the case the eccentricity and tilt angle are zero.
- Please insert the shaft up to the marking line J or J₂ correctly.
- The moment of inertia and mass are shown for the maximum shaft hole diameter.
- The recommended shaft tolerance is h6. (For a shaft diameter of 35 mm, it corresponds to a tolerance of +0.010).
- The hub shape (φEₑ) on the taper side of the shaft may differ depending on the manufacturing method and mold.
- The taper shaft diameter can be made to 14 mm.
- The maximum rotational speed does not consider dynamic balance.
- The ◆ symbol indicates that a center nut cannot be used.

