Made in Japan
Manufacturer: Chino Corporation
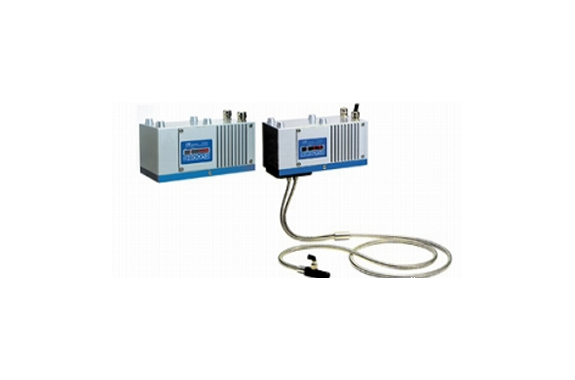
Model: IM Series
Features
Up to 10 wavelengths, capable of measuring 4 constituents such as; moisture, film-thickness, organism, and coating-thickness in real time simultaneously.
Connectivity to multiple interfaces, RS485 (MODBUS), Ethernet (LAN)
High-speed & High-repeatability (28ms)
Multi-calculation function
Self-diagnostic function, easy maintenance.
Conforms to CE standards
Models
Multi-Analyzer
| Names | Models |
|---|
| Mirror Type (Reflection) | For general moisture | IRMA1100□□ |
| For high in moisture | IRMA1200□□ |
| For trace amount of moisture | IRMA1300□□ |
| For thickness/Coating (NIR) | IRMA7100□□ |
| For thin film thickness/Coating(IR) | IRMA7200□□ |
| Fiber Type (Reflection/Transparent) | General moisture | IRMA2100□□ |
| For high in moisture | IRMA2200□□ |
| For thickness/Coating | IRMA8100□□ |
*Fiber-optic is necessary for fiber type.
Infrared Multi Analyzer
| Measuring System | Infrared absorption type |
|---|
| Measuring Wavelength | Up to 10 wavelengths |
|---|
| Measuring Component | Up to 4 constituents |
|---|
| Measuring Distance/Diameter | Mirror type: | Measuring distance 300mm (can be installed in 200 to 400mm) Diameter 50×50mm (at measuring distance 300mm) |
|---|
| Fiber type: | With lens…φ20/25mm to φ40/100mm Without lens…φ20/15mm to φ50/50mm (transparent is special) |
| Output Signal | (1) Analog signal: 4 to 20mADC, ±0.2%FS (Load resistance 500Ω or lower) (2) Communication signal: RS-485 (MODBUS)…Standard (3) Ethernet (LAN) *(3) can not use with RS-485. |
|---|
| Output Update Interval | 28ms |
|---|
| Display/Setting | Data display, set value display, various setting can be key in |
|---|
| Calibration Curve | Linear equation to cubic equation, and multiple regression equation Calibration curve correction function is available (1st to 2nd correction) |
|---|
| No. Of Calibration Curve | 99 (max) |
|---|
| Calculation Function | 2-color and 3-color ratio calculation, multiple regression calculation |
|---|
| Smoothing Processing | 0 to 99.9sec., can be set freely |
|---|
| Calibration | Calibration can be done with checking plate |
|---|
| Self-Diagnosis Function | Contact and communication output at self-diagnosed abnormal conditions |
|---|
| Correction Input Function | Correction of measured data with an external 4 to 20mA DC input (1 input) (Sample temperature correction, others) |
|---|
| Contact Input/Output | Contact input (Di): One function selected from preset, data hold, or the real/smooth switching can be input via the contact input. Contact output (Do): One function selected from the self-diagnosis function (1b) or the high/low alarms (1a) can be output as the contact output. |
|---|
| Working Temperature Range | Working Temperature Range 0 to 50°C (Cooling air is necessary if the working temperature is 45°C or higher. Dry air approx. 30°C or lower for instrumentation is use |
|---|
| Power Supply | 24V DC (Supplied from attachment power supply unit IR-WEP. Support power supply unit: 100 to 120V AC, 47 to 450Hz) |
|---|
| Power Consumption | Approx. 30VA |
|---|
| Connection | Terminal connections (Cable gland) |
|---|
| Case | Aluminum casting |
|---|
| Weight | Approx. 4.3kg |
|---|
Setting Display Unit
| Input Signal | RS-485 (from detector), Max 9 devices can be connected |
|---|
| Output Signal | (1) Analog signal: 4 to 20mADC, Three outputs *(Load resistance 500Ω or lower) *For multiple heads, detector No. 1, 2, 3 each one output (2) Communication signal: Specify RS-232C, RS-422A, or RS-485 |
|---|
| Output Scaling | Numeric keypad setting (0.1 step) |
|---|
| Output Update Interval | Communication output: 28ms×Number of connected detector |
|---|
| Display | (1)Measured value display □□□□.□ (Decimal point position can be changed) (2) Head No. CH.No., Parameter display |
|---|
| Smoothing T | Setting of smoothing time at smoothing calculation/ T=0.1 to 99.9s |
|---|
| Calibration Operation | When output checking plate is inserted, perform calibration by key operation or external contact. |
|---|
| Hold/ Preset Operation | Hold/Preset display and output by key operation or external contact. |
|---|
| Calibration Curve Correction | Online correction of input calibration curve, Linear equation to quadratic equation correction |
|---|
| External Setting Function | Head No. CH.No., Calibration, Hold. |
|---|
| Alarm Function | Contact output (1 output) to HCL terminal when it is out of setting range. |
|---|
| Self-Diagnosis | Contact output (1b) at detector self-diagnosed abnormal conditions with lamp indication. |
|---|
| Power Supply | 100 to 240V AC 50/60Hz |
|---|
| Power Consumption | Max 15VA |
|---|
| Working Temperature Range | 0 to 50°C |
|---|
| Case | Flame retardant polycarbonate |
|---|
| Installation Method | Panel flush-mount |
|---|
| Weight | Approx. 0.6kg |
|---|
Fiber Unit
| Measuring Distance/Diameter | With lens… | φ20/25mm to φ40/100mm |
|---|
| Without lens… | φ20/15mm to φ50/50mm |
| Fiber Length | Standard 1.5m, Max 5m (at reflection fiber) Standard 2m, Max 10m (at transparent fiber) |
|---|
| Fiber Protection | Stainless steel corrugated tube |
|---|
| Minimum Bending Radius | R100mm |
|---|
| Working Temperature Range | 0 to 150°C |
|---|
| Air Purge Function | With lens…without purge function Without lens…5 to 20NL/min |
|---|
| Attachment | Horizontal installation holder, flange holder |
|---|
